Securing services with split DNS and Tailscale
Table of Contents
What is split DNS?
Split DNS is a mechanism to route DNS records differently depending on the network.
It’s easier to explain this with an example.
Given a domain, example.com, we can route it and all its subdomains to an IP
address: 1.2.3.4.
Performing a look up on foobar.example.com will return 1.2.3.4:
dig +short foobar.example.com
1.2.3.4
Performing the same look up via private DNS can return different results:
dig +short foobar.example.com
100.53.187.53
Why is this useful?
I use this for exposing services within my Tailnet rather than the public internet.
This is useful for services that may have their own authentication, but where I don’t trust the authentication mechanism(s), or where I’m not sharing the service with any friends or family.
Examples of services I host like this:
Implementing Split DNS
Set up Tailscale
Follow Tailscale’s excellent quick start documentation.
Next, install Tailscale on the machine you’ll be hosting private services on.
At this point you should have:
- Tailscale installed on your development machine
- Tailscale installed on the machine you’ll be using to expose private services
Take note of your private machine's IP address, as we'll be setting DNS to route to this IP in the next section.
tailscale status

100.101.100.10   hugos-mbp            username@      macOS   -
100.53.187.53    private-machine      username@      linux   -
└─┬─────────┘
  │
  │
  └── Take note of this IP address
Set up DNS with NextDNS
I have no interest in running my own DNS service, so I use NextDNS (sidenote: Don’t worry, this isn’t a referral link, I promise. I genuinely use this service, and find it useful for blocking ads as well.)
Once you’ve signed up, you’ll need to configure devices accessing private services to use NextDNS.
As we only want to route private services, we can
(sidenote: This way we avoid having to add a new DNS route for each of our services.) our DNS record with
internal, e.g. *.internal.example.com.
Including the * prefix routes all subdomains to the same route, e.g.
abc.internal.example.com and def.internal.example.com will resolve to the
same IP address.
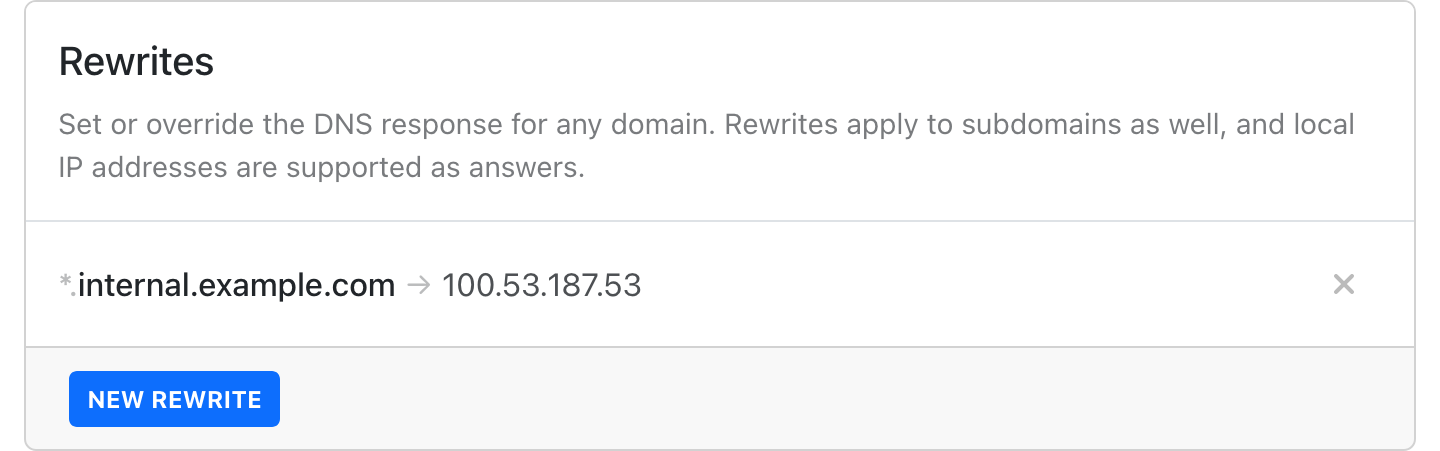
Now you can add an internal rewrite in settings, routing
*.internal.example.com to the Tailscale IP address of the private machine that
we noted down in the previous section:
Now NextDNS should return the Tailscale IP address of your service:
dig +short foobar.internal.example.com
100.53.187.53
If you’re running a webserver, that should also return a default response:
curl foobar.internal.example.com
<html>
<head><title>404 Not Found</title></head>
<body>
<center><h1>404 Not Found</h1></center>
<hr><center>nginx</center>
</body>
</html>
Restrict access with Kubernetes Ingress
As a bonus, if you’re running Kubernetes on your private machine, you can restrict access to only IP addresses within your Tailnet.
Conveniently, all Tailscale IP addresses are in the 100.x range. You can restrict access by adding this annotation to your Ingress:
apiVersion: networking.k8s.io/v1
kind: Ingress
metadata:
  name: foobar-internal
  namespace: foobar
  annotations:
    nginx.ingress.kubernetes.io/whitelist-source-range: "100.64.0.0/10"
# ...
Help!
I’m aware I haven’t gone into great depth in this post, so feel free to contact me if you have any trouble or questions.
On the web
More confessions from a FOSS enthusiast
Thu Apr 16 2026 by joelchrono's blogI Wish I Could Talk to My Dad
Wed Apr 15 2026 by Kev QuirkShow Remaining Characters in a Filament Text Input
Sat Apr 4 2026 by stefanzweifel.devBuilding a Runtime with QuickJS
Thu Mar 26 2026 by Andrew Healey's BlogBuilding a self-hosted cloud coding agent
Tue Feb 3 2026 by Stan's blog
Generated by openring