Kubernetes & Traefik with local Wildcard certificates
This was originally posted on Medium.
As a passionate software engineer at Localz, I get to tinker with fancy new tools (in my own time) and then annoy my coworkers by evangelising said tools in the workplace. Kubernetes is just one of those tools, and we’re currently exploring it for use internally! 🐙
Here’s a little tutorial I’ve whipped up for getting Kubernetes up and running on your Mac, and deploying some small services.
Overview
- Installing Kubernetes
- Installing
dnsmasqto route our DNS locally and handle traffic for the.localextension - Provisioning a certificate with
mkcert - Setting up Traefik to handle our service routing
- Creating a demo deployment & testing out what we’ve just done
Installing Kubernetes
Download Docker for Mac Edge, which allows you to enable Kubernetes in just a single click! At the time of writing, Kubernetes hasn’t made it to a stable release yet.
Once you’ve installed Docker for Mac Edge, open up preferences, navigate to the Kubernetes tab, check Enable Kubernetes and select Kubernetes as your orchestrator, then hit Apply!
It might take a few minutes for Kubernetes to start up, so in the mean time go grab a coffee or a nice glass of red! 🍷
Once Kubernetes has installed successfully we’ll need to switch to the correct context:
kubectl config use-context docker-for-desktopRunning kubectl get nodes should give you the following:
NAME                 STATUS    ROLES     AGE       VERSION
docker-for-desktop   Ready     master    17m       v1.10.3
Installing dnsmasq
Next we’ll install dnsmasq so that we can redirect any requests to .local directly to our local Kubernetes cluster, while leaving other requests intact!
To install:
brew install dnsmasqOpen up /usr/local/etc/dnsmasq.conf and append this line to it:
address=/k8s.local/127.0.0.1The above will redirect all .local traffic to 127.0.0.1 but you could use any IP and any domain name extension you’d like.
Now start dnsmasq:
sudo brew services start dnsmasqNext we’ll create a new resolver to handle all of those queries:
sudo mkdir /etc/resolverAnd create a new file at /etc/resolver/dev with the following contents:
nameserver 127.0.0.1Set your DNS to 127.0.0.1 in System Preferences > Network > Advanced > DNS. Don’t worry, this won’t null route you as we’ve set a fallback to Cloudflare DNS (1.1.1.1).
Flush your DNS for good measure:
sudo killall -HUP mDNSResponderNow if you dig a .local domain locally, you’ll find it redirects to 127.0.0.1!
dig k8s.local @127.0.0.1

; <<>> DiG 9.10.6 <<>> k8s.dev @127.0.0.1
;; global options: +cmd
;; Got answer:
;; ->>HEADER<<- opcode: QUERY, status: NOERROR, id: 8631
;; flags: qr aa rd ra ad; QUERY: 1, ANSWER: 1, AUTHORITY: 0, ADDITIONAL: 0

;; QUESTION SECTION:
;k8s.local.                       IN      A

;; ANSWER SECTION:
k8s.local.                0       IN      A       127.0.0.1

;; Query time: 0 msec
;; SERVER: 127.0.0.1#53(127.0.0.1)
;; WHEN: Mon Aug 27 20:52:19 AEST 2018
;; MSG SIZE  rcvd: 41
Using mkcert to create a local certificate authority
First install mkcert:
brew install mkcertThen we can install the trusted Certificate Authority:
mkcert --installNow we can provision a wildcard certificate for our new local domain:
mkcert '*.k8s.local'This will create two files: _wildcard.k8s.local-key.pem and _wildcard.k8s.local.pem.
Finally, we can create a Kubernetes secret to store the newly created certificate:
kubectl -n kube-system create secret tls traefik-tls-cert --key=_wildcard.k8s.local-key.pem --cert=_wildcard.k8s.local.pemSetting up Traefik
Note: normally you’d want to separate things into different namespaces, but for brevity I’ll just be using kube-system.
First, we’ll apply the ConfigMap resource. Let’s create file called configmap.yml with the following contents:
This will make traefik.toml configuration file available to the Traefik container. With [kubernetes] enabled, it will look for Kubernetes Ingress entries and make them available publicly.
Apply configmap.yml:
kubectl apply -f configmap.ymlNow we can deploy Traefik, creating deployment.yml and applying it:
This will deploy Traefik to Kubernetes, and create a service that exposes it on ports 443, 80, and 8080.
Apply deployment.yml
kubectl apply -f deployment.ymlNow we’ll create a new file called rbac.yml which will give Traefik access to look for Ingresses:
Apply rbac.yml:
kubectl apply -f rbac.ymlRunning kubectl get pods --all-namespaces, you should see a line that looks like the following:
kube-system traefik-ingress-controller-6659bcdd46-7jh4l 1/1 RunningNotice Running and 1/1 — if it appears as ContainerCreating or 0/1, you’ll have to give it a few moments to startup.
Now if we hit k8s.local, it should say load with 404 page not found.
Creating a deployment
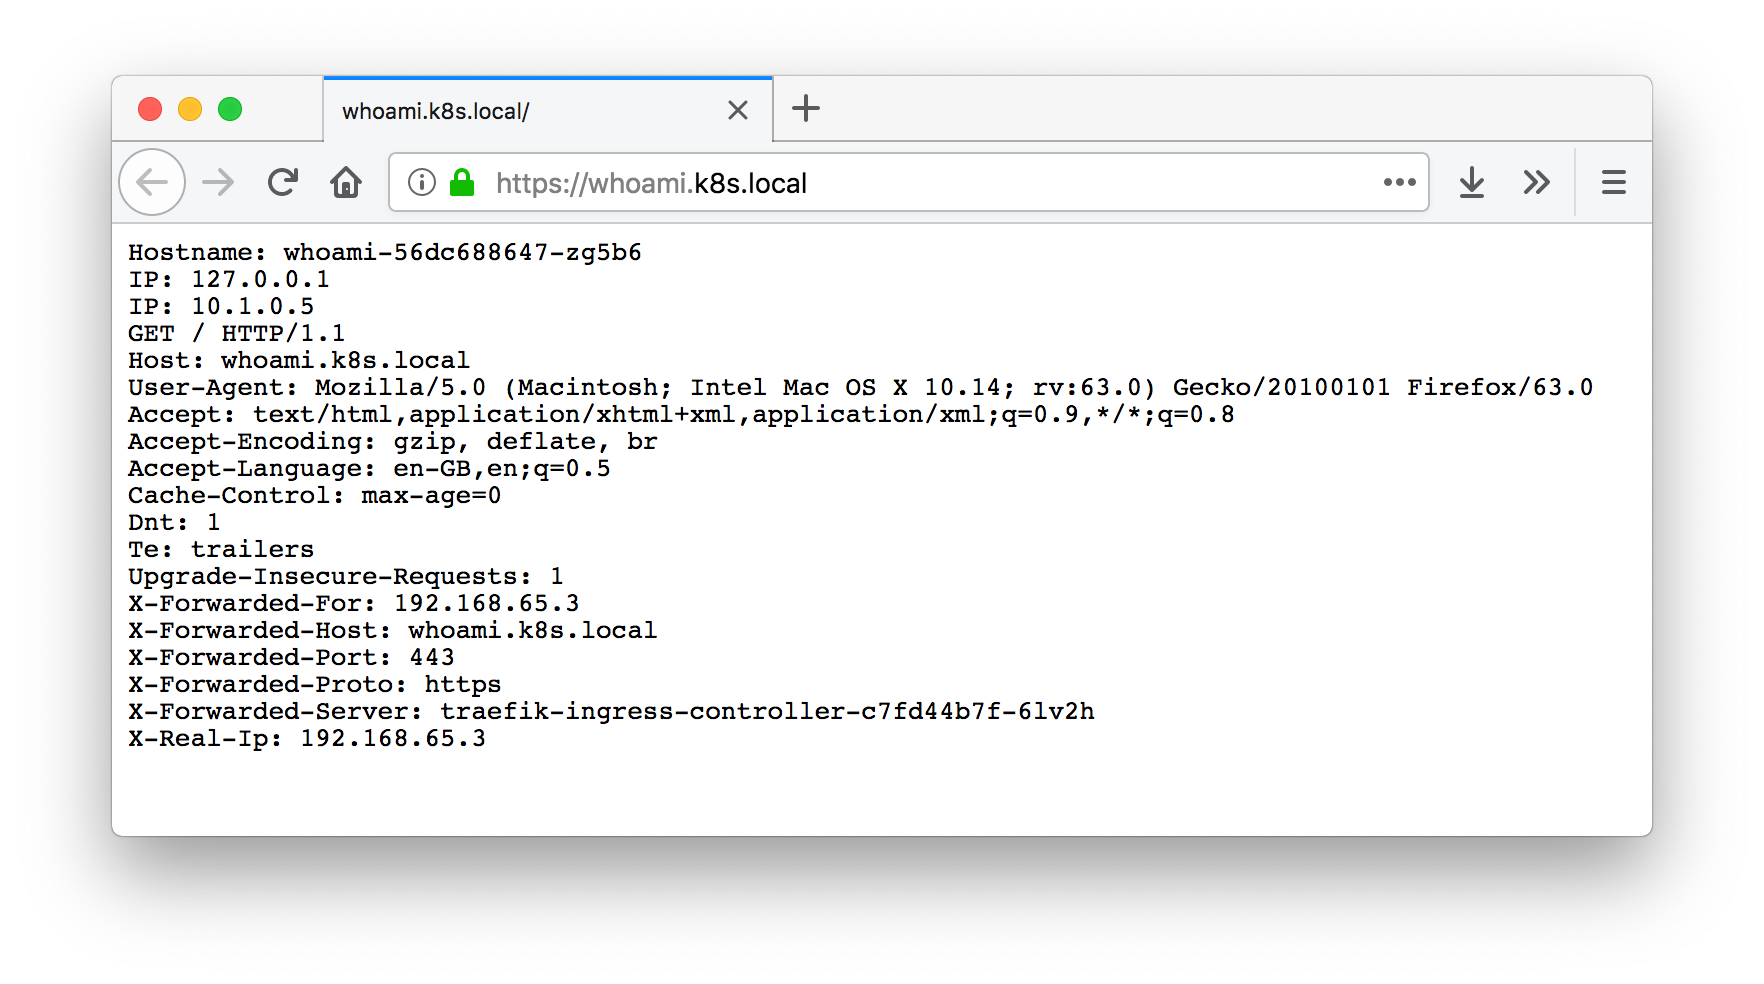
We’ll deploy containous/whoami, a neat little image which shows container information.
We’ll create a file called whoami-deployment.yml which will consist of a deployment, a service, and an ingress:
Now we can apply this:
kubectl apply -f whoami-deployment.ymlNow if you hit https://whoami.k8s.local it should pop up with container and host information, rather than that 404 we were seeing earlier!
You’ve now got your very own local Kubernetes cluster, and a neat way to expose services over HTTPS!
If you’ve got any questions, feel free to hit me up on Twitter or Mastodon, I’m always keen to help out! ✌️
On the web
More confessions from a FOSS enthusiast
Thu Apr 16 2026 by joelchrono's blogI Wish I Could Talk to My Dad
Wed Apr 15 2026 by Kev QuirkShow Remaining Characters in a Filament Text Input
Sat Apr 4 2026 by stefanzweifel.devBuilding a Runtime with QuickJS
Thu Mar 26 2026 by Andrew Healey's BlogBuilding a self-hosted cloud coding agent
Tue Feb 3 2026 by Stan's blog
Generated by openring